Pathfinder 
Morris Water Maze search strategy and entropy analysis.
Created by Matthew Cooke at The University of British Columbia, Jason Snyder Lab
For more information about the features and usage of Pathfinder please visit our wiki
Synopsis
The Pathfinder package is a search strategy analysis tool for the Morris Water Maze, and can be expanded for other spatial navigation tasks. The program analyses X-Y coordinate data exported from commercially available tracking software. Pathfinder currently supports outputs from: Ethovision, Anymaze, WaterMaze, and ezTrack. We then calculate the best-fit search strategy for the trial. Trials are fit into one of: Direct Swim, Directed Search, Focal Search, Spatial indirect, Chaining, Scanning, Thigmotaxis, and Random Search.
Citing
If you use Pathfinder, please cite: Cooke MB, O’Leary TP, Harris P et al. (2019) Pathfinder: open source software for analyzing spatial navigation search strategies. F1000Research, 8:1521. https://doi.org/10.12688/f1000research.20352.2
Launching Pathfinder
- The program can be opened by calling pathfinder.
- This will open up the GUI window.
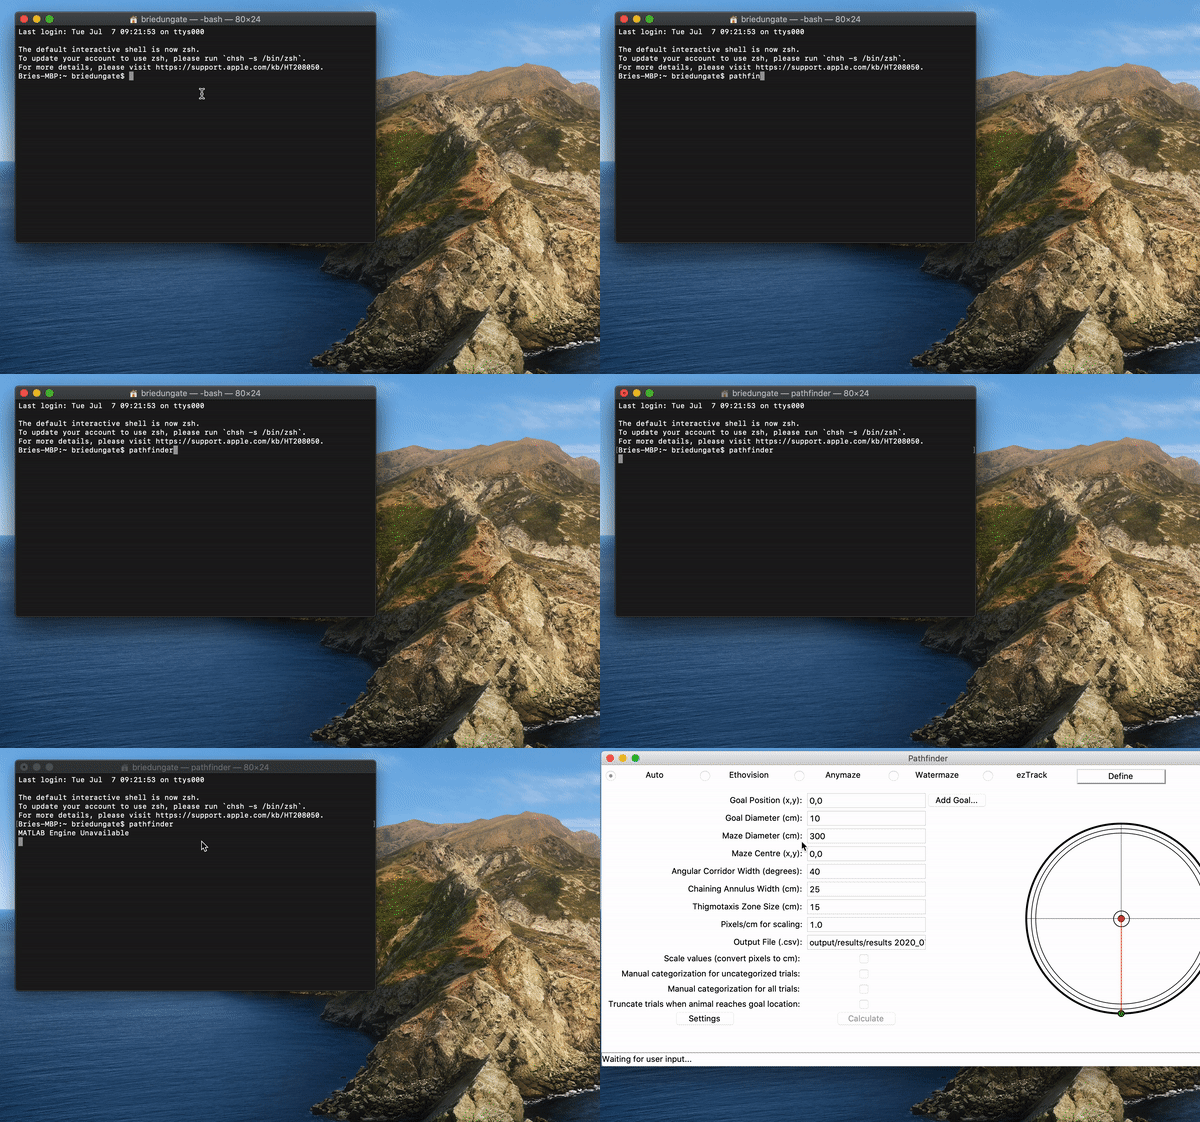
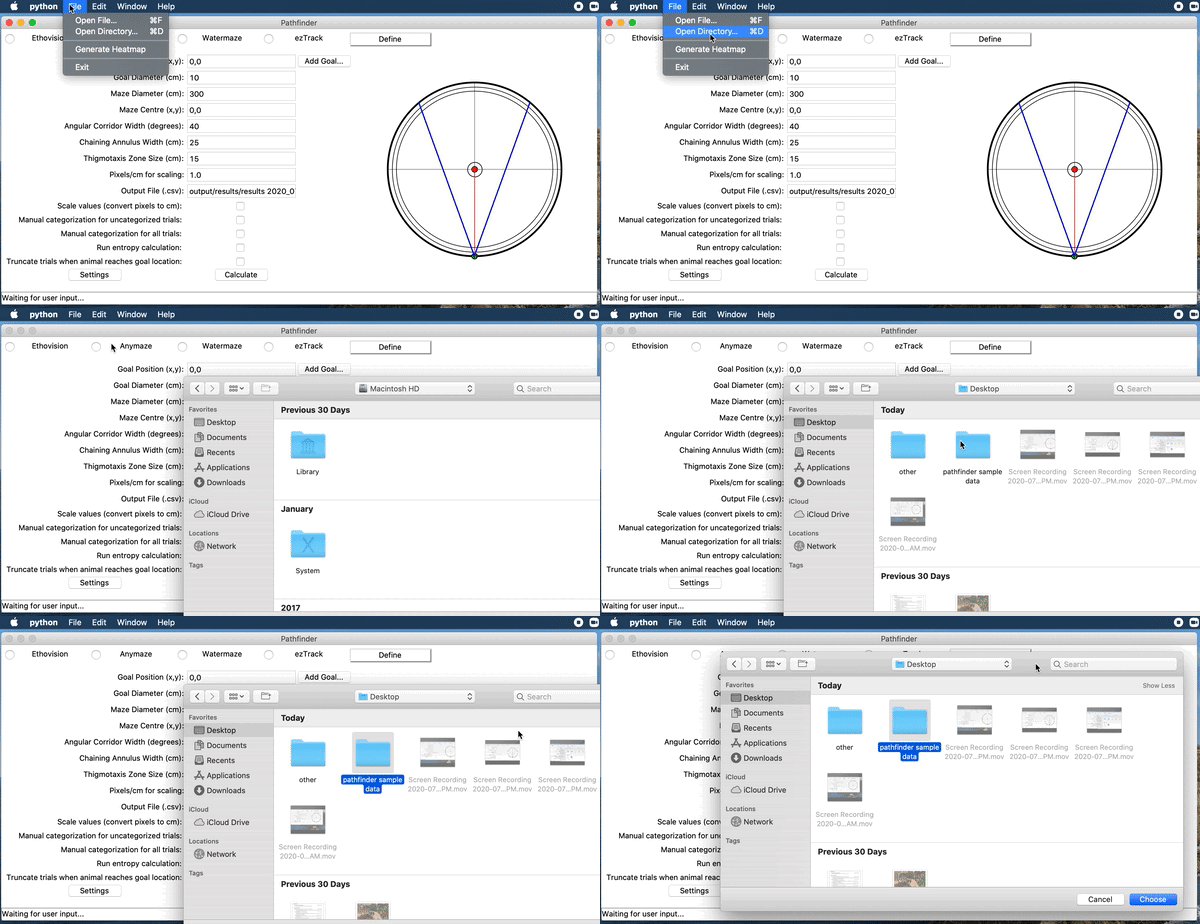
- You can then select an inividual file or a directory containing files from the File dropdown menu. These files must be Excel files if you are using Ethovision tracking software, and CSV files if you are using Anymaze, Watermaze, or ezTrack software. Define supports both Excel and CSV files.
Search Strategy Analysis
-
For search strategy analysis we have multiple options. To set your own strategy parameters, click custom.
-
(Settings) The settings button will spawn a parameters panel
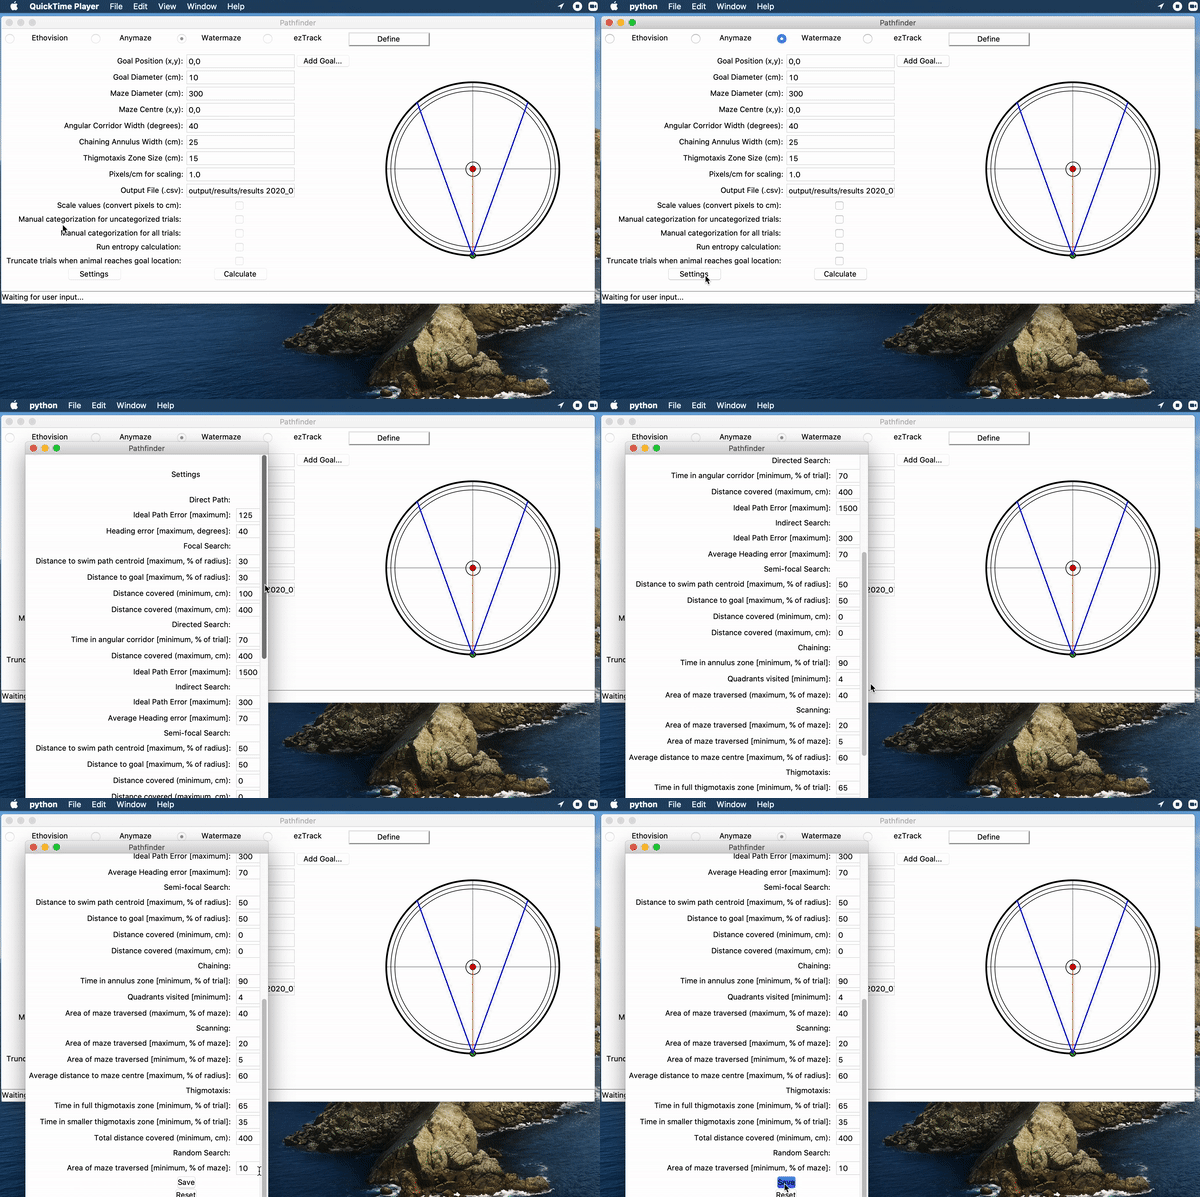
-
In the custom parameters pane, you can select and deselect any of the search strategies. Deselecting Strategies will remove them from consideration. You can also define the cutoff values for each strategy. See https://github.com/MatthewBCooke/Pathfinder/wiki/Description-of-Parameters for detailed description of parameters
-
Once you have chosen your parameters, be sure to select your tracking software. Ethovision, Anymaze, ezTrack and Watermaze are currently supported. We also have a “Define” button that allows users to import most non-supported files.
-
You may then alter the main values to suit your data. Platform position, pool centre, and pool diameter can be automatically calculated for groups of trials using one constant platform location. For all other data you must manually define these values (Example:
Platform Position (x,y) | 6.53,-17.3).
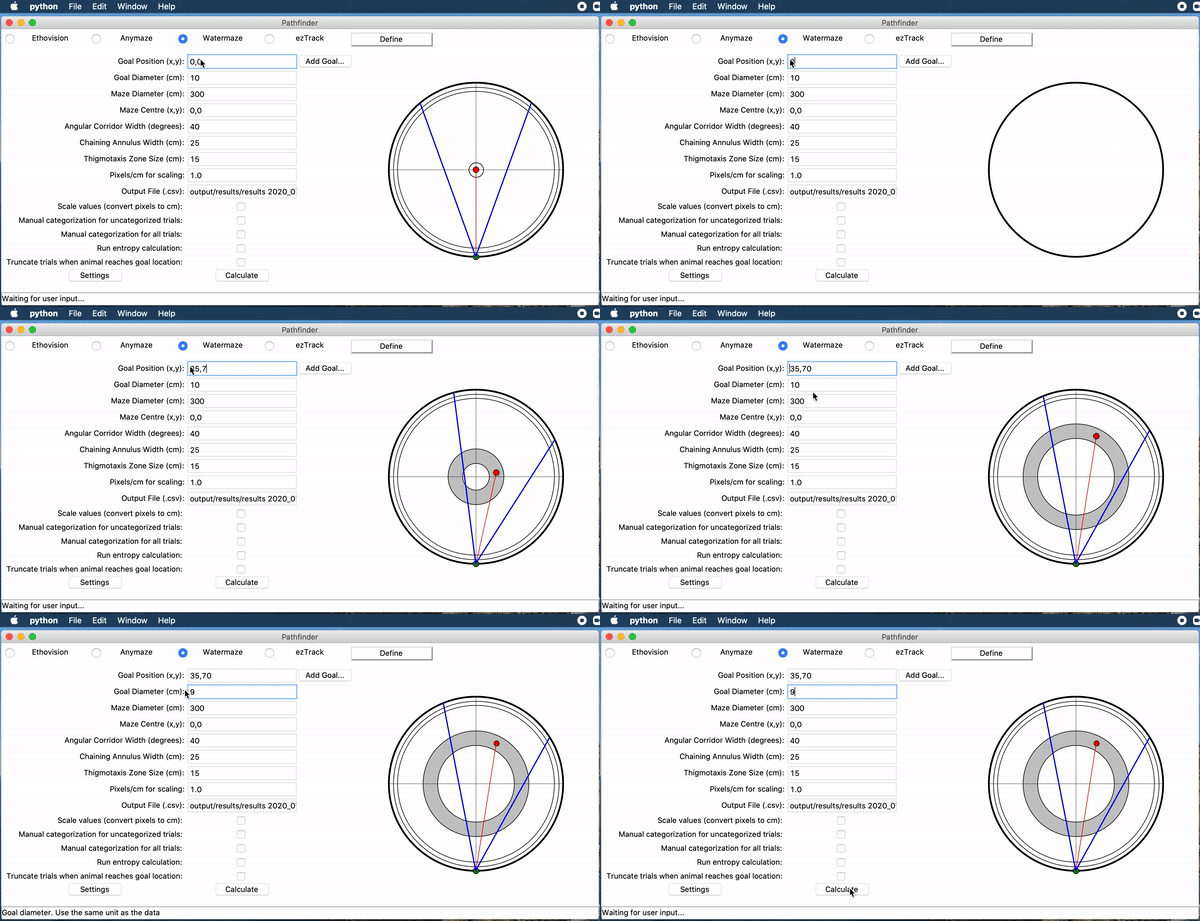
- There are 3 checkboxes above the Calculate button. The first, Scale Values is used to automatically scale the default values in an attempt to better match your data. This uses the Pixels/cm and the pool diameter to determine a constant C with which to multiply some parameters. (Note: If you are using custom values, it is best to disable scaling) The two other checkboxes enable manual categorization. Manual categorization can be used for trials in which our algorithm was unable to make a determination (Manual categorization for uncategorized trials) or for all trials (Manual categorization for all trials).

- Once you are satisfied with your parameters, click calculate. This will begin the process of determining search strategies for the trials. Once calculation is complete you will be shown a display of the results.
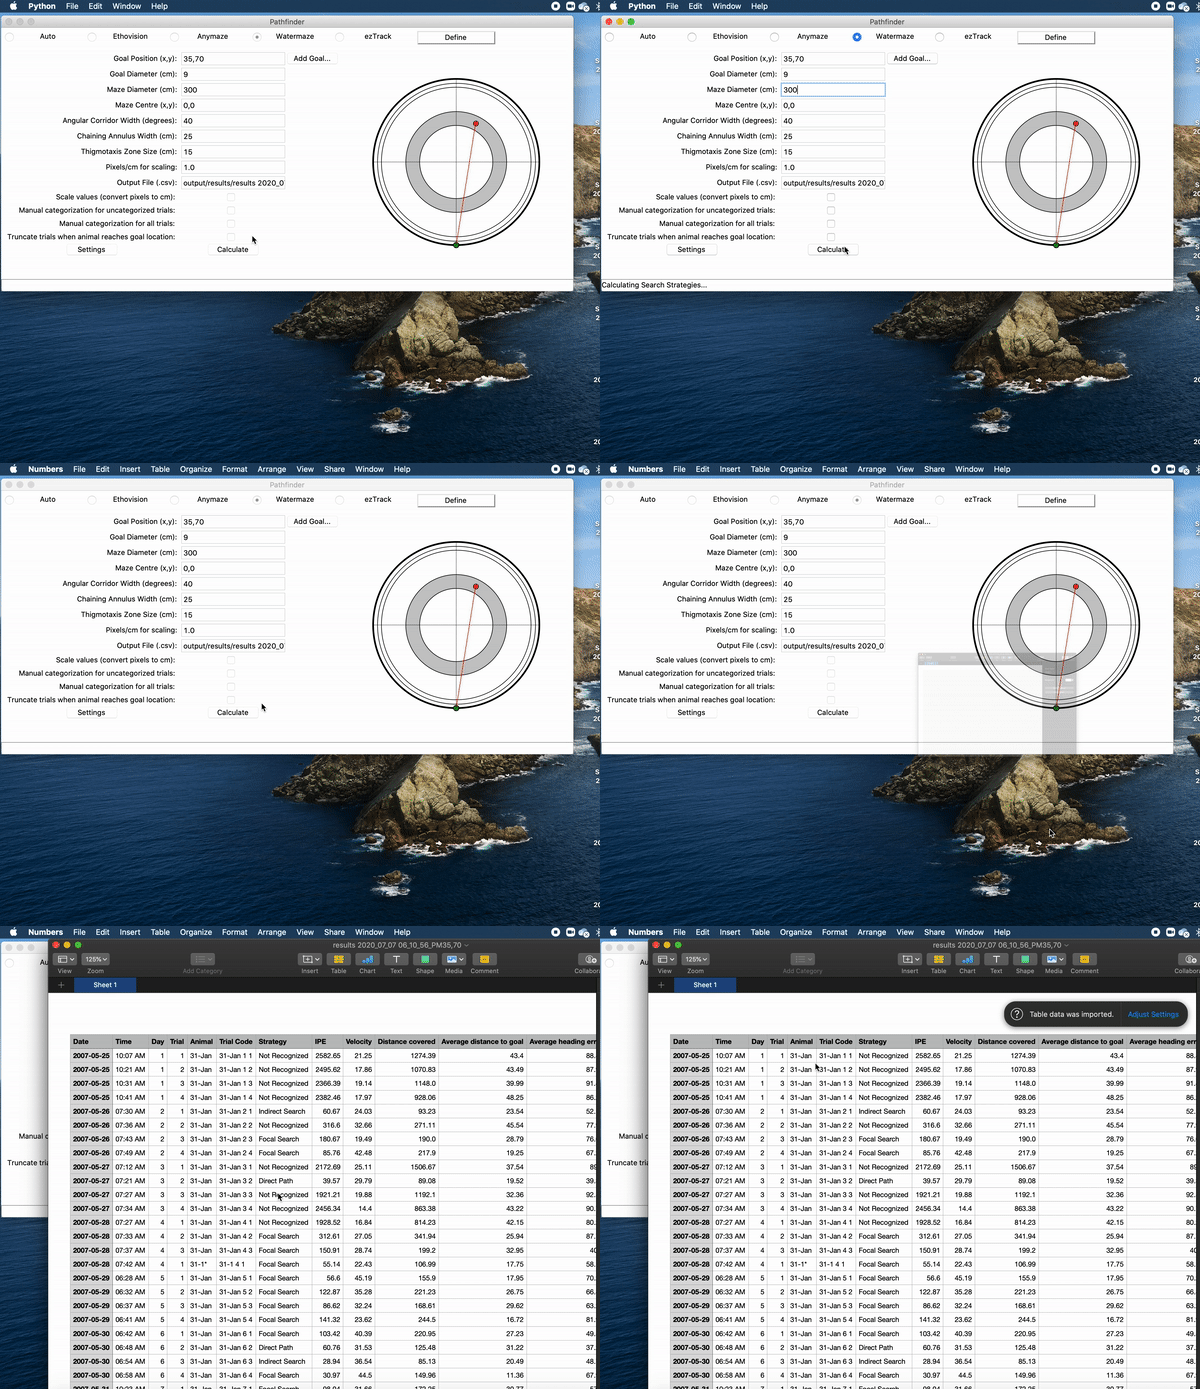
- Your results will be saved as a
.csvfile with whatever name was chosen in the Output File field. You will also receive a log file of the excecution (“Logs” folder), and any generated paths from manual catagorization will be saved under “Paths” in your present working directory.
Heatmaps
-
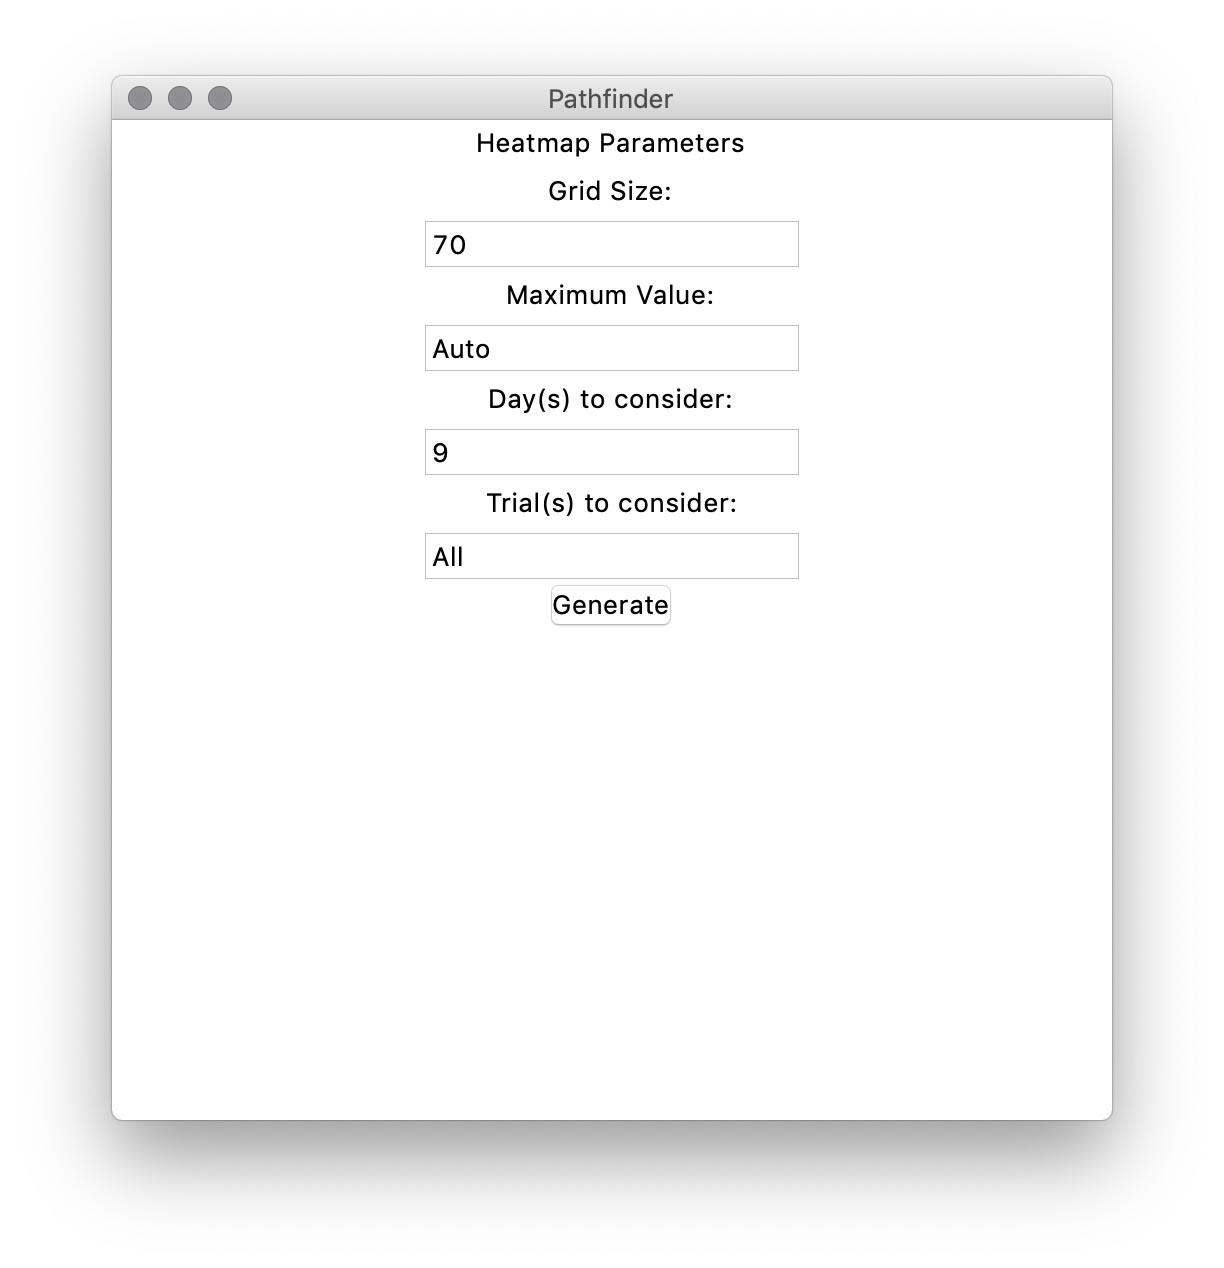
The parameters panel lets you tailor the output to your needs:
-
Grid size. This roughly translates into how many bins to put the data in. For more information on grid size see matplotlib documentation: http://matplotlib.org/devdocs/api/_as_gen/matplotlib.axes.Axes.hexbin.html
-
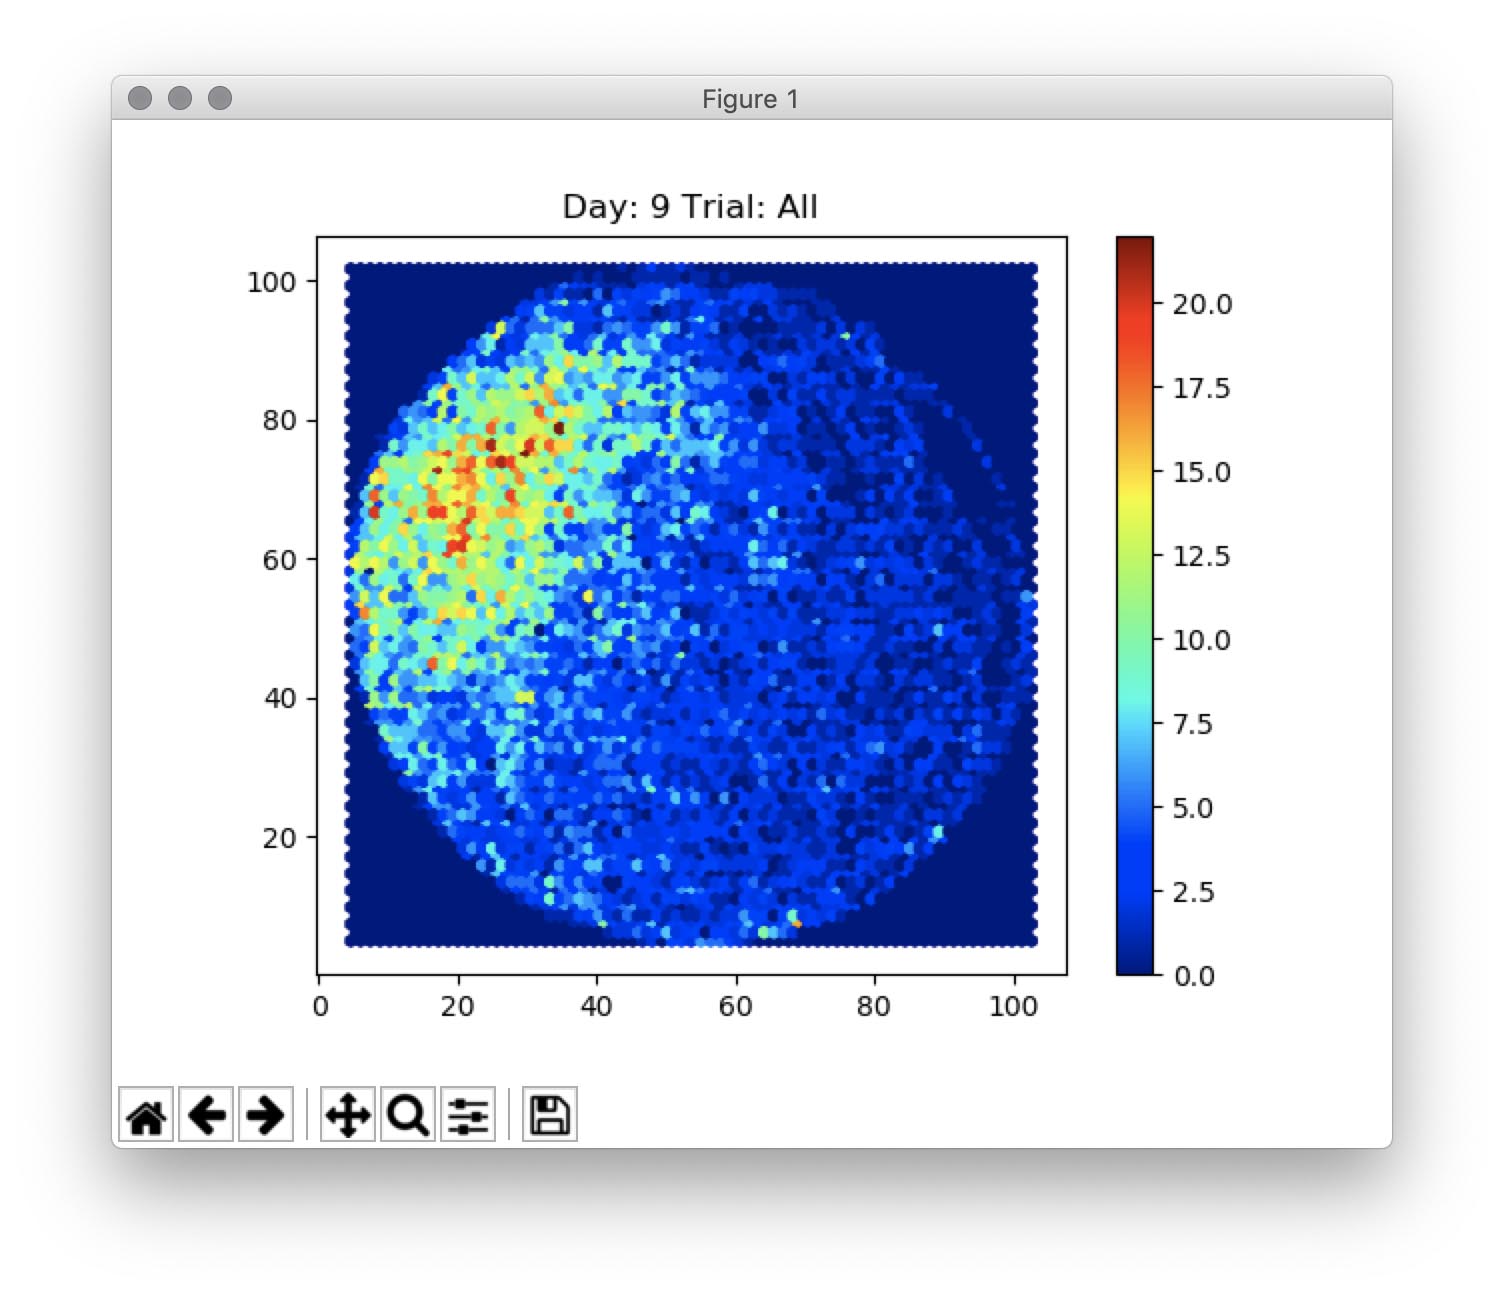
Maximum Value. This will allow you to change at which value the points in the heatmap will become their most saturated (dark red). Setting ‘Auto’ will dynamically assign the maximum value to be equal to the value of the maximum grid.
-
Day: A day or range of days to use for calculating the heatmaps. (E.g. 1 or 3-6 or All)
-
Trial: A trial or range of trials on the above selected days. (E.g. All or 1-4 or 2)
-
-
You can then click generate, and our software will plot a heatmap of your trial data. These will be saved in the “Heatmaps” subfolder.
Multiple ROI
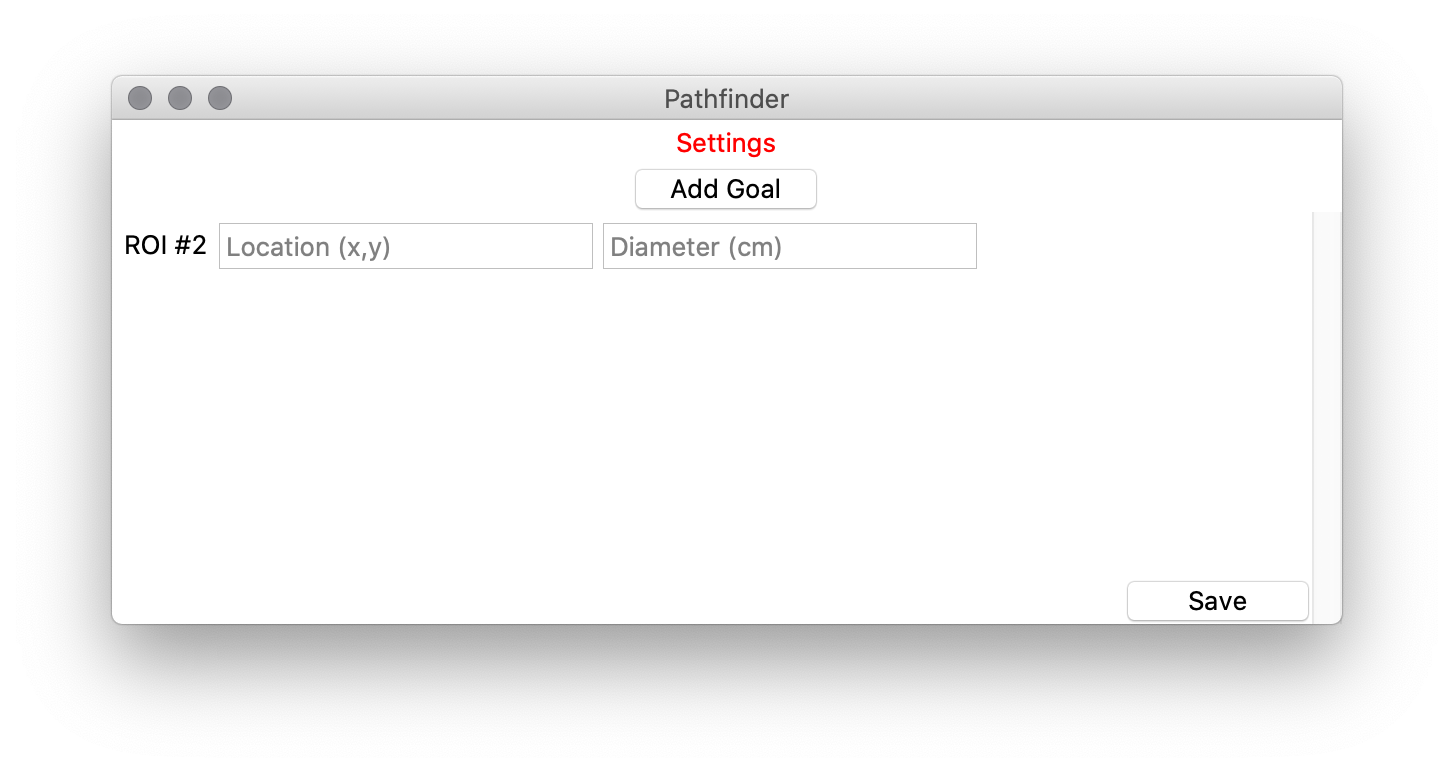
- You can use the ‘Add Goal…’ button to add an unlimited number of goal locations or regions of interest. The will allow Pathfinder to calculate relative to each position.
Defining Software
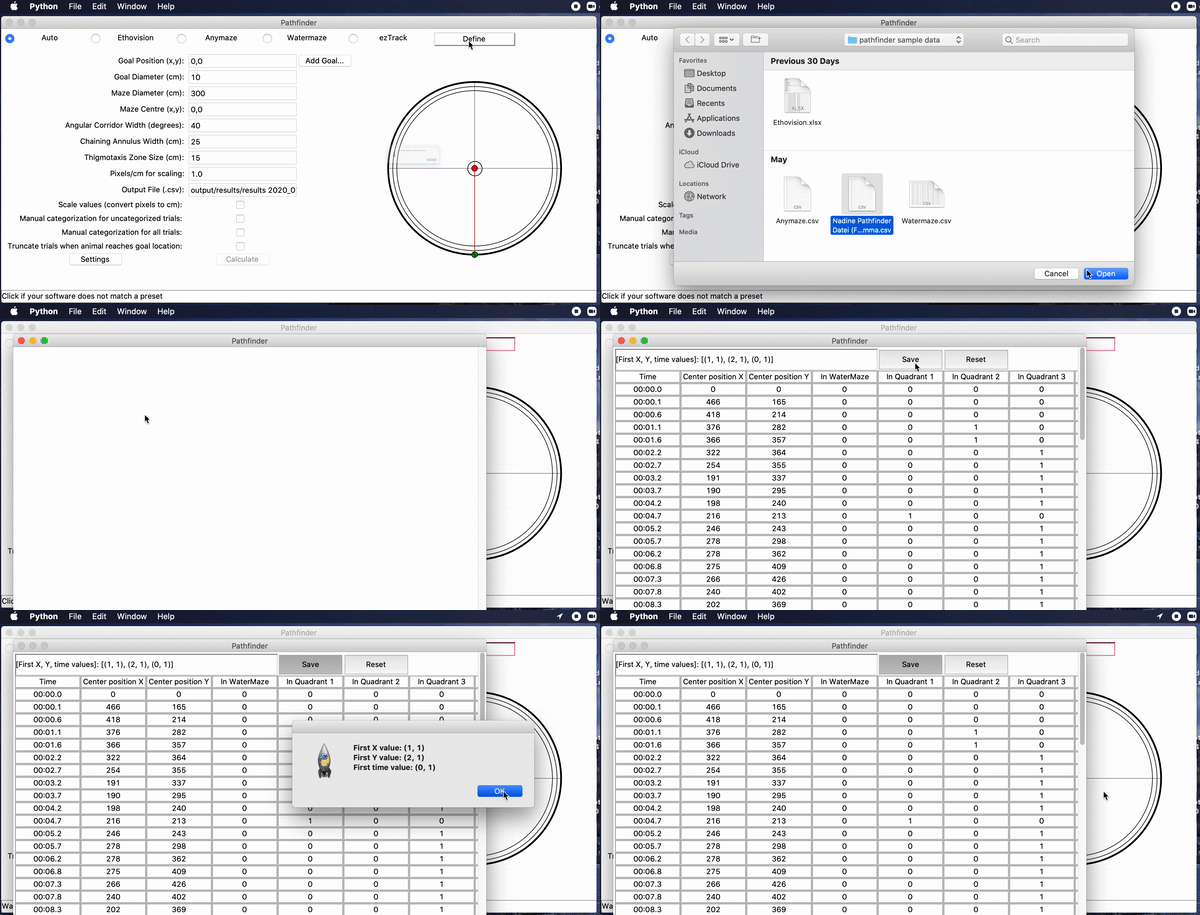
Defining software allows Pathfinder to accept data from CSV or Excel that we haven’t yet added support for. This works by prompting the user to select a sample file, and by selecting relevant cells, instructs Pathfinder where to look when dealing with the dataset.
-
You can use the “Define..” button if Pathfinder is unable to read your software files.
-
Click on the Define button on the main View pane and a popup will appear. Select a sample file that is the same format as your dataset.
- A window will open asking you to select a sample file from your dataset.
- You will then select the appropriate X, Y, and Time columns in your sample file.
- IT IS IMPORTANT THAT YOU THEN RE-OPEN THE DATASET USING THE FILE MENU, EITHER BY OPEN DIRECTORY OR FILE, BEFORE ATTEMPTING TO CALCULATE.
Motivation
This program was developed in order to simplify as well as remove inconsistencies in Morris Water Maze search strategy analysis.
Installation
Installing the program is easy for both macOS and Windows users.
Pathfinder requires you to have Python 3.6 or later. We highly recommend installing Conda for python via the Anaconda 🐍 package https://www.anaconda.com/distribution/. Once installed, the installation of Pathfinder is easy.
For the most recent stable version, cloning the GitHub repository or installing via PyPi is possible. For the most recent beta version of the software, the develop branch of the GitHub repository will host the version currently being worked on.
Installation Instructions:
Windows:
Installing from the Python Package Index:
Launch a CMD window by launching run from the start menu, and typing CMD in Run.
Once the CMD shell has opened, type pip install jsl-pathfinder
Press enter
Installing from GitHub
Download and install Git here: https://git-scm.com
Open Git Bash.
Change the current working directory to the location where you want the cloned directory to be made.
Type git clone https://github.com/MatthewBCooke/Pathfinder
Press enter
Mac:
Installing from the Python Package Index:
Open a terminal window (located in your utilities folder under the Applications directory.
Type pip install jsl-pathfinder
Press return
Installing from GitHub
Open a terminal window Navigate to the folder you wish to install Pathfinder into
Type git clone https://github.com/MatthewBCooke/Pathfinder/
press return
License
GNU GENERAL PUBLIC LICENSE Version 3, 29 June 2007
Copyright (C) 2007 Free Software Foundation, Inc. http://fsf.org/ Everyone is permitted to copy and distribute verbatim copies of this license document, but changing it is not allowed.